Sunday, January 29, 2012

Pedicure Toe-Up Socks


I've been intimidated by the idea of sock knitting for a long time. And why? I figure if I can make gloves, I can probably manage a wussy pair of socks. But still--the toothpick sized needles, the skinny, skinny yarn...

Anyway, the time came to knit birthday presents for the girls. Jess already knits scarves, I've already made her two hats, and she has a pair of my fingerless gloves. It was time to branch out.

Every time we go to Jess's apartment in the city, we end up on the floor, socks off, surrounded by her myriad bottles of nail polish, and get creative with our fingers and toes. Jessica is a connoisseur of nail color. And since she has an old drafty apartment and lives in a chilly, breezy city, it was a natural conclusion: pedicure socks. Alas, it was time to face my sock knitting fears. So I did a cop out.

I have some more hand-spun yarn of questionable quantity, so I definitely wanted to make them from the toes up. That way, the length would be determined by the amount of yarn, and I wouldn't run out before I finished the foot. Also, I knit these simultaneously on two sets of #3 double points.


Since I made them in a stripe pattern, and the heel is comprised of only one color, I had to carry the other strand up the center of the heel as I was knitting it. So I ended up crossing a purl stitch in front of the unused color every other row.
Due to the sport weight, rather than sock weight yarn, I used #3 instead of the usual #2 sock size needle. However, I probably could have gone with #4, too. Check your gauge. I based my pattern off of this generic toe up method, courtesy of Wendy Johnson.

I was relieved that the project was successful, and I'm now inspired to make a real pair of socks, toes included.

I went ahead and wrote up a pattern. Download it here. Feel free to comment with any questions. Happy knitting! Happy toenail painting. Happy warming.
Posted by Picasa

Thursday, January 26, 2012

Knitpicks Needles

I got a set of new interchangeable knitting needles for Christmas. Aren't they pretty?! These are the Knitpicks Harmony needles, laminated birtchwood. The joins are very smooth, the tips are just sharp enough, but not too sharp, and the needles themselves aren't too sticky, aren't too slick. Love them.

And the best thing is, they're so pretty that they actually make knitting more fun. If you can imagine that.

Posted by Picasa

Saturday, January 21, 2012

String Bowl

I had read an short how-to years ago on making a string bowl similar to this one. At work the kids were getting stir crazy after the fourth day of snow and ice, so I brought the materials for these bowls. Though they loved making them, this isn't just a kid's craft. The one I made really is a piece of art that could easily be sold at stores retailing upwards of $30. Check out the materials:

- 100% cotton string or yarn (I chose Lily Sugar 'n Cream yarn in a variated purple color)
- Elmer's glue (or similar off-brand)
- Bowl of any size for mold
- Plastic wrap to protect bowl from glue
- Bowl to put glue in

I would post a How-To PDF but have yet to find a good one online. Here are the steps to create one similar to mine:

1. Cover the outside of bowl or mold in plastic wrap

2. Pour a generous amount of glue into extra bowl

3. Cut desired size of string and completely saturate with glue (you can always add more string, the more you start out with the greater chance of it knotting in the glue)

4. Drape string around bowl in any desired pattern (if you want it to be sturdy, pay close attention to the bottom of the bowl and make sure it has a solid base)

5. Let glue dry for about 4 hours on the plastic wrap

6. After the glue dries on the outside, there will still be wet glue on the inside. To prevent the plastic wrap sticking to the glue on the inside I took the string bowl off the mold, took out the plastic wrap, and set it right side up to dry overnight.

The finished product is very impressive and I currently have mine on display on my dining table as decoration.


Tuesday, January 17, 2012

FairIsle Snowflake Earwarmer Headband

Well, I've been wanting to make a knitted earwarmer for a bit now, and since Jessica already got one for her birthday, I just went ahead and made one for myself. I've never used this method before and have been a little intimidated by it--following charts, keeping track... it all seemed so meticulous.

I found this pattern on Leandra George's website and it was so easy to follow. I softened the colors up using a lovely caramel base and a pale teal snowflake, using some homespun 100% wool yarn given to me by a friend. I love working with homespun yarn--the variations in texture and thickness make it so authentic. And the feel was wonderful; each time I worked it I could feel the lanolin on my hands.

I used my bamboo #5 US needles and it came out just a touch too big (I am *always* too lazy to knit a swatch first to check guage--that's what I get for it). I shrunk it a bit in the washer though, and now it's perfect.

It came in very handy today, as our first snowfall of the year started last night, having us up early for a long, long snow walk. Though I was covered in snow and got pretty wet, my ears stayed toasty throughout.
Posted by Picasa

Friday, January 13, 2012

Sprucing Up a Card with String

Embellishing an otherwise plain (relatively speaking - check out that funky fresh medical tape!) greeting card can be as simple as tying a knot. This string was actually picked up at a local yarn shop in the clearance drawers. I found the colors and texture so interesting I had to have it, though I knew I wouldn't knit with it. Using it in small doses really shows off how unique the string is. I simply wrapped it around the fold of the card and double knotted it on the outside. It's not rocket science.

Knitted Leg Warmers

On cold winters days like these I have a hard time getting warm in our wood-heated house.  And SNOW is predicted for the weekend!  Yay!  It's days like this when I get my craft on.  No, literally.  I get my craft on.  Over my second-skin Polartec tights and thick socks, I pull my new leg warmers and then slip into my felted clog slippers.  Toasty.  Throw on a sweatshirt and my cabled fingerless gloves and I'm perfectly set to curl up on the couch with a mug of hot tea.  Wardrobe is 50% custom home made, 100% energy efficient heat source.  I guess it's Mom who cranked it into us--if you're cold, don't turn up the heat, just put more clothes on.

I originally made the leg warmers because one of my November resolutions (yes, I make monthly resolutions; check out The Happiness Project) was to pay more attention to my attire and wardrobe and to dress up more often. My tendency is pretty tomboy drab.  Less jeans, more skirts; less clogs, more boots.  Naturally, an adorable pair of leg warmers peeking over my boot tops was called for.  I had no idea that I would really wear them around the house, every single day, without fail.  I love them so much.

I'm pretty tall, about 5'10", and one skein of Cascade Yarns Lana Bambu made one pair of mid-calf height leg warmers.  The yarn, a wool/bmboo viscose blend, was an absolute DREAM to work with.  Loved it.  Grab a second skein if you want them longer.  I used my current set of bamboo US #8 double points for one of them, and knit the other simultaneously on a US #8 Addi Turbo circular (this was my first time using one of these, after hearing all the hype, by the way, and I'm a believer!).  As such, I finished each leg warmer at the same time and they came out matching.  So that's a plus.

It's a pretty simple pattern, but if you want a printable download, feel free to grab it here.  Happy knitting, happy warming.

Wednesday, January 11, 2012

Frame-less Photo Wall

When I first moved into my apartment, I started taping my favorite memories to one of the walls. Photos, ticket stubs, unframed art work, handwritten notes, even business cards. I had almost covered the entire wall. I thought it looked cool for a while until I realized it was so unorganized it made my whole apartment seem messy. This is an important thing to remember in small abodes - if one part of the room is distracting [in a negative way], it will affect the entire space. This week I took it all down and picked out my favorite 4x6ish sized memories and hung them simply using 8 tacks, 4 pieces of string, and some clothespins.

Drawer Liners (2 ways)

I have some ugly drawers in my kitchen. Here's the proof:


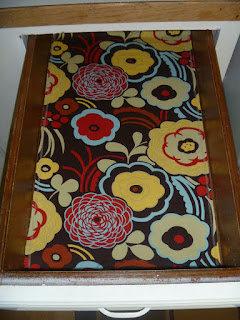
So I decided to pretty them up with this cute fabric. I ironed stabilizer onto the back and sewed the edges with a zig zag stitch. I have 12 more drawers to go but this time I'll use the serger; this will make a neater edge.


This is the drawer to my little side table. I lined this drawer using Mod Podge. I brushed it right onto the drawer, layed the fabric down and brushed more on top. It looks so cute I don't want to put anything in it.


Posted by Picasa

t-shirt infinity scarf

I love the idea of an infinity scarf. Here's my way (again with a slacker project). I took an old t-shirt and cut it into strips, tied them together then stretched them out. You can make the strips thin and it ends up looking like a knit necklace (I have done this and it's very cute) or you can cut the strips wide and make it into a scarf. Here are some pics, enjoy!

Headbands--by Mel

>
> Here are some easy headbands I whipped up after the kids went to bed.
> They are a quicker (slacker) version of the headband I really want to
> make - http://www.happytogethercreates.com/2011/07/double-sided-fabric-headband-pattern.html
>
> - but I still love them. I intend to make more (and other quick
> creations) in the time I get between poopy diapers and mountains of
> laundry.

Monday, January 9, 2012

Cabled Wrist Warmers

I found a pattern a long, long time ago for fingerless gloves / wrist warmers.  In fact, it was my first adult knitting project (having learned to knit scarves in 3rd grade, I had a basic idea of knit, purl and casting on) and I learned some more basic skills from it.  Oh the wonders of Google.  M1L?  What?  Thank goodness for Youtube--otherwise, I suppose I'd still be stuck with scarves and dishcloths.

Anyway, I've made any number of these for myself and for family members, relying on several different patterns.  I combined these, refined them for my own style, and added my obsession of the moment:  cabling.  The culmination is what you see here.  I've attached a pdf of the pattern (and this is my first attempt at writing a knitting pattern--any edits/feedback are greatly appreciated).  It's a fun pattern, and they are so cute.  I have a few pairs of my own, and so do my mom, I think all my sisters, and my best friend.  I can make these from memory by now.  A pair of these for yourself first, and then wear them to keep your hands warm as you knit a pair for every person on your list.

I apologize for the poor photo quality.  It's difficult to a) photograph one's own left hand with a DSLR in the b) low winter northwest light.

Download the printable pdf pattern here.

Sunday, January 8, 2012

The $8 Throw Pillow

After purchasing a down throw pillow insert at Ikea for $7, I decided to dust off my sewing machine. I couldn't believe how much people pay for the covers of the throw pillows. Once you've bought the insert and cover, you've easily paid $20, $30... $50... Way too much!


I went to Goodwill Outlet* and found a plus-size dress in a gray/pink floral print with a long zipper in the back. The dress cost $0.50. I also found a light aqua sheet with a white floral print. $0.25. Talk about cost effective.


The zipper from the dress was the same length as the pillow (20 inches), so I decided to re-purpose it in making the throw cover removable if needed to be washed. Using a seam ripper, the zipper came off easily and I sewed it onto both of the fabrics used to cover the pillow before sewing up the other sides.


There you have it ladies and gents, a down throw pillow for under $8. Plus, it's way cuter and more personal than any throw you'd find at a home goods store.


*Goodwill Outlet does indeed exist. The one in Seattle is a warehouse of used clothes, furniture, and other items piled high before they are sent off to the other Goodwill stores. It can be overwhelming with the bins and bins of unsorted items to rummage through. It can be frightening with some shoppers donned in latex gloves and flu masks in an attempt to avoid possible germs on second-(or tenth)-hand items. However, the gratification of stepping up to the cashier, piling your goods onto a scale, paying for them by weight (not by brand, size, or level of awesome) will indeed fill you with joy and you will soon forget about the terrifying adventure it took to get to the cash register of Goodwill Outlet.

Slouch Hat -- Or, One of the Many Great Uses for Remnants

I found this pattern after a Google search for a basic chunky hat. And voi la, discovered the adorable Midnight Knitter. I heart her patterns. She may even inspire me to try crocheting again.

My goal was to make a quick hat in an afternoon, to use up some remnants I had floating around my knitting bag, and for it to be sort of interesting. I have cabled a few hats, but for the most part I make the typical K4 P2 ribbing, then stockinette to the crown.

So, holding my worsted weight blend double along with the lavendar mohair (now three strands), I also alternated a strand of chunky weight blue, purple and cream, for a total of 4 strands at any given time. The mohair made it SOOOOO SOOOOOFT. Dreamy.

It's pretty loose and floppy and I imagine I'll need bobby pins to keep it on. Sort of lazy beret style I guess. I'm not quite sure I got the shape of it right (that's what I get for diverging from the pattern in my choice of fibers) but I've just blocked it and it's lying flat by the fire. We'll see how it sits on my noggin when it's dry.

My SSKs didn't quite look like they do in the photo on the pattern. They almost look cabled. Which is fine. I did confirm that I'm doing them correctly, too. I like the more geometric look of MK's, though. Maybe I'll try again.

Super fun, easy project. That touch of mohair made it a total dream to work. And I love the colors. They remind me of Fashion Star Fillies :)
Posted by Picasa

Saturday, January 7, 2012

Infinity Scarf

I was at American Eagle recently and saw the cutest thing--a long circle of stripey stretchy fabric: a scarf with no ends. I had the hardest time describing it, but I knew I wanted one. Well, if something is makable, I typically eschew the idea of spending money on it--especially when I already have plenty of yarn on hand. (These scarves, by the way, are called "infinity scarves." I was informed thus by my hipper, younger sister Jessica.)

I hate making projects that take forever! Don't even get me started on the cardigan jacket sweater that I'm currently taking a break from. So I cleverly got out my connect-a-needle set with the longest connector, chose a ridiculously small needle size (#7 US I think?) and proceeded to cast on HUNDREDS of stitches. Rather than knit the width of it and then sew the ends together, I knit it lengthwise, and joined it in a round. I thought that would make the texture a little more interesting and unexpected. But it certainly did take forever.

Anyway, this project kept me going though a few weeks' of night shift lunch breaks, kept my fingers going all the way down the west coast in the passenger's seat on a recent road trip, and I finally finished it on the plane back north. It's 100% wool and it's VERY warm. Perfect for windy winter days--no worries about it coming unwrapped. I love the concept and I have a few more of these on my list of pending projects. This is the last one I'm knitting lengthwise, though--any future infinity scarves will be knit width-wise and sewn together at the ends.
Posted by Picasa