 |
| Photo of Skulls |
 |
| Black and White Charcoal Drawing |
 |
| Gesture Sketch with Charcoal |
 |
| Pen and Ink Drawing |
|
| Photo of Skulls |
|
| Black and White Charcoal Drawing |
|
| Gesture Sketch with Charcoal |
|
| Pen and Ink Drawing |


 My friend Jeannie had this beautiful wrap cardigan--it was exactly the type of sweater I'd been wanting to make for myself, and had yet to find a pattern for it. I was desperate--you know how you know there is something you want to make, but just can't find someone who's designed it? That's how it was.
 I love this sweater. I wear it all the time. It's the first thing I pull on when I wake up in the morning, or when I get home from work. I wear it out over leggings or jeans. Super warmy. Who needs to pay a heating bill now?
 I knitted a belt for it, and I also sewed some buttons on the side--I'm still deciding on my favorite closure. I love the way it drapes around; it's very snuggly.

 Having lost all his hats, and feeling the cold of winter come on, my sweetie asked me to make him one. On of my many favorite yarn stores, The Textile Arts Company, was having a sale a few weeks ago so I headed over. Among other things, I found this lovely variegated 100% wool: Wisdom Yarns Poems in Olive Grove. I bought two skeins and got to work.
 We had a visitor from California recently for whom I had previously made a pair of felted clog slippers. Our floors are cold up here in the Pacific Northwest in October and we wanted her feet to stay toasty, so we reminded her to bring her slippers along for her visit. Unfortunately, when she got here, she found that her slippers were a slippery combination with our oak floors, and didn't want to wear them. When faced with a situation like this, I know to turn to my sailmaker's bag.
 Now she not only has non-skid slippers, but they will last so much longer with the leather in place. I wish I had thought of doing this sooner to my own pair, whose soles are so far gone that I'm in the process of making a replacement (more on that later).
 |
| Betsy's Work of ART |
 | ||
| Gauguin's Tahitian Woman |

 I first misted the top half with water, then brushed on a minty aqua acrylic. I went over the paint with my fingers because I didn't want any brush strokes. I then misted over it again to give it white splotches and to fade and feather the line where the paint meets the blank canvas. Then I let it dry.
 Lastly, I warmed up my heat gun (which I usually use for heat embossing but I must admit, melting hot wax is way more fun) and heated the ends of the crayons. Because it's wax, the melting crayons drip slowly enough to have a bit of control over the outcome.

 I've been working night shift for a few months, and my wardrobe at work consists of hospital-issue ciel blue scrubs (shirt with one chest pocket, pants with one back pocket) and a navy blue jacket (two front pockets). Last month I switched to days and evenings, which is a bit of a busier routine. Pair that with the lack of so-tired-should-be-asleep-this-time-of-night chill that accompanies night shift and I'm way too hot at work for the jacket. Well, that decreases my pocket capacity by about half. Where the heck am I supposed to put all this essential stuff?!


 Well, the Christmas and birthday rush was over and Valentine's Day was looming. My sweetheart hasn't received any hand-knitted projects from me in a while, so his turn had come. I bought this yarn for its natural, undyed, undulating color variegation and its supreme softness. It is the same Cascade Yarns Eco Duo that I used to make the Cabled Earwarmer Headband.


 I bought a set of 100 postcards at Blick Art Supplies a few weeks ago. The postcards feature Pantone's iconic color chip design in 100 different colors (and 100 different names). They were so cool and for $20 I had to have them. Instead of sending them in the mail, I taped them up onto my wall to create a colorful border for my incredibly high walls (I'm lucky enough to live in an old building with high ceilings). I measured the length of my wall beforehand so I knew how many I could fit in an even border. It turned out I only needed 78, so I didn't include the browns, grays, and blacks. $20 for an awesome Pantone color border? Anyone can do that.
 So, the Cascade Yarns website has a TON of free patterns. That's where I found this one: Up to My Ears in Cables. I used Cascade Yarns Eco Duo (70% undyed baby Alpaca and 30% undyed merino). It's as soft as anything and lovely to work with. A really soft, subtle natural stripe emerged as I was knitting, which accents the pretty cable really well. Joined it with the three needle cast-off for a really pretty, nearly undetectable seam.
  So I'll start this post off with a story of being in the right place at the right time. The moral of which is that accidental felting isn't always as disastrous as it may initially seem.
 I've always made really warm, cozy scarves, and they're great from November to January. But now it's February and the days are getting warmer. (Seriously!) I've been wanting to make an autumn/spring scarf for a while--something not to stiflingly hot on less than frozen days. And of course, you now know that I have a thing for infinity scarves.
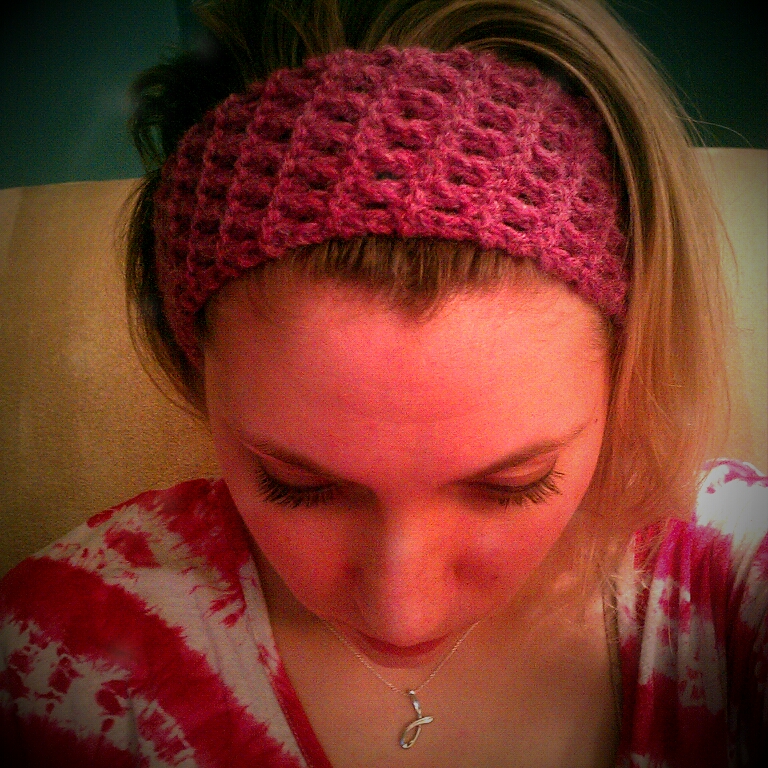


 My niece turned 7 last weekend and I made her a scarf that knit up quickly and was very inexpensive. I usually prefer using expensive and luxurious yarns - but for this little girl who likes to run around and play hard I went with a machine washable acrylic (yet, so soft!) yarn. I worked in a 2x rib stitch (K2, P2, etc.) and it knit up very quickly, it was done in just a few hours.


